Needle in a Chocolate Haystack 

Mk that’s just a cute name, there are no needles in these cookies.

A friend of mine made oatmeal haystacks a few weeks ago, and it reminded me of this delicious and easy recipe. I’m not sure when or where I had them at first, but they’re so tasty.
I think the hardest part of these was finding all the ingredients. The noodles are not easy to come by. The chocolate is molding chocolate from Michaels, the the little marshmallows were from smart and final, and are lucky charm consistency.

So these little stacks of awesomeness are only three easy steps. Melt. Toss. Drop.

Chocolate goes in microwave per directions.

Then noodles and whatever else you want. I did one batch of mini marshmallows and one with peanuts.

Then drop little piles on to wax paper. And let dry.


They dry at room temp, within a few hours.


Then crunchy chocolate goodness is all yours!! Make sure you have enough to share with your friends!

~M

The Mouthful – Peanut Butter Banana Chocolate Chip Cookie Bars 

I love experimenting with new treats, and cookie bars have proved very forgiving. So I ask that in return you forgive me as I have forgotten all the ingredients… Also I have learned my lesson of waiting 2 weeks to post a recipe. Whoops.
So anywho, tell me this doesn’t sound delicious… Peanut Butter Banana Chocolate Chip Cookies. Right? Yum!!M Kinda a mouthful, but also a mouthful of goodness.

Things start simply enough… The egg. (I remember this, the picture helped)


Then one of my defrosted bananas.

Then some brown and white sugar, melted butter, and vanilla.

The last of my peanut butter 😦 if you see me in the store remind me to get more

Then some flour and baking powder… Maybe a pinch of salt

and a nice chunk of chocolate chips… Cause everyone likes chocolate!

Then I spread them out in my best baking dish!

And Curt kicked some butt at 350 for about 20 mins. And she’s golden brown and oh so good.

So I’m like 90% sure that’s all that went into in these… But I really just don’t know.

But they were good. I promise I’ll make them again and add some notes.

Xo

~M

Tiramisu-ish 

For as long as I can remember I have loved Tiramisu, but I have never made it at home before. I looked up a few recipes and it seemed easy enough. After a few days searching for ingredients I had everything I needed to make a classic Italian Tiramisu. 
After a long nap, I dived in.

I started by separating 3 eggs. There are many techniques for this but I use the technique my mother taught me. Crack the egg in half, and slowly and carefully pass the yoke back and forth between the two halfway until all the whites have fallen off. Then set the yoke in a separate bowl.

Once I had three yokes, I added 1/4 cup of sugar and started whipping. Once the mixture was light yellow and creamy I set it aside.


Then I folded in the mascarpone cheese. And whipped until there were no more lumps.


Then I worked on whipping the whites.. Which turned out to be a lot more difficult than I planned. I whisked and whisked but was making no progress. I was suppose to be making soft peaks.

Seeing that I didn’t have an electric mixer, I thought maybe a blender would do the trick.


It did not. I decided to add them to my my yolk and mascarpone anyways and try to whisk he whole mixture to add volume. This still wasn’t working so I added some Greek yogurt and a little more sugar.


It still looked nothing like it was supposed to, but I decided to muscle on.

I used some instant coffee to make some very strong coffee, with a little sugar. Once this had cooled I added it to a wide Tupperware along with 2 shots of dark rum.


I decided to dive in and start stacking. I dipped the fingers into the coffee and rum, lower half only to maintain some of the crispness of the cookie.

Once I had an even layer of fingers, I poured in the mascarpone mixture. But to my dismay… The fingers began to float. I don’t think that’s supposed happen. So I added more lady fingers.


They kept floating. I poured the rest of the mix.. And everything was still floating. I knew once this all was refrigerated it would set.


But if it was gonna look anything like a Tiramisu I needed to press it down while it set. So I covered it in plastic wrap, and set a big bag of flour on top.


I left in the fridge for about 5 hours, and it came out looking ok. But not very finished.


So I topped it with some shaved chocolate

Some cool whip, that barely covered it. And a touch of cocoa powder.

I don’t consider this a success, so there no recipe. If you wanna try this yourself just Google a recipe and follow their directions not mine.


This was not easy, but it was still pretty tasty and kinda sorta pretty. All about the journey and learning something new!
~M

Butterscotch Brownie Bars One Idea Two Attemps 

I had an idea, but no recipe. I hope by now your not surprised. In the end there were two recipes both a little off target, but still delicious.
I wanted to make some butterscotch chocolate chip cookie bars.

My first recipe was a peculiar mix of two past recipes, some confusion and imagination. I believe it included the following… Perhaps don’t serve it to guests, but still eatable.
1 1/2 cups flour

1/4 cup cocoa powder

1/3 cup sugar (1 of brown, 1 of white)

1 tbsp baking soda

1/4 cup canola oil

1 egg

1 tsp vanilla

1/3 cup hot water

1/2 cup butterscotch chips

1/2 cup chocolate chips
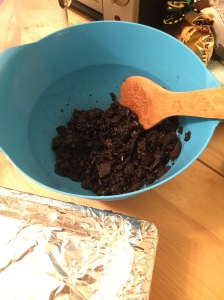
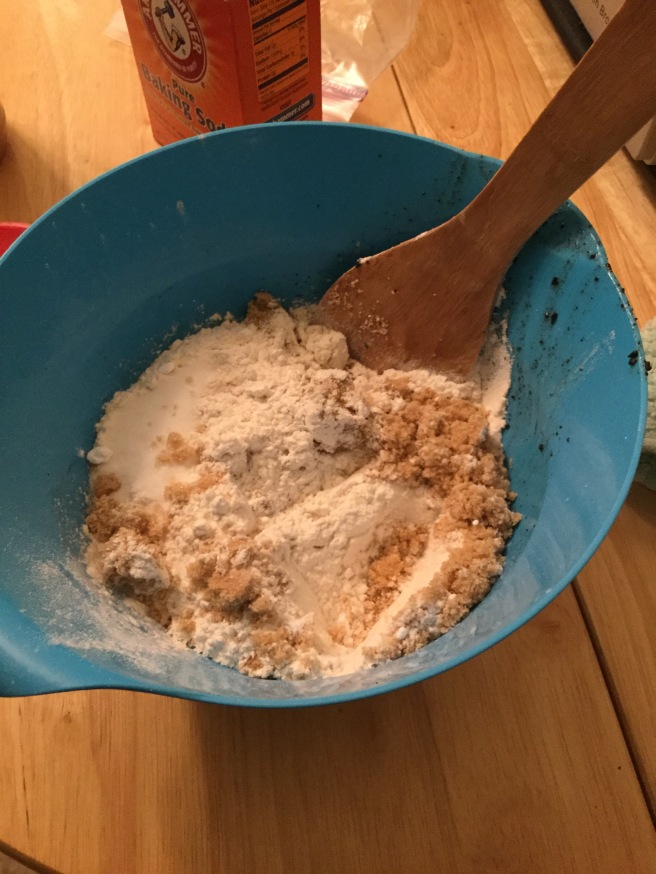
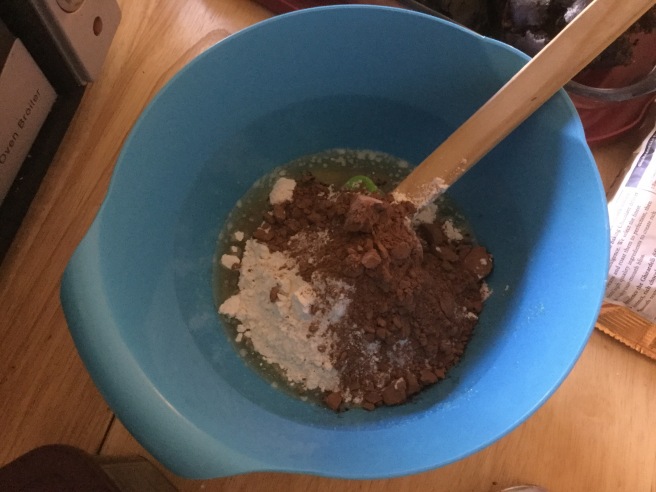
I started with the dry ingredients … Flour, sugars, Cocoa and soda.

Then the wet ingredients… Oil, egg, vanilla and water.

But there was too much wet, so I added more flour and cocoa.

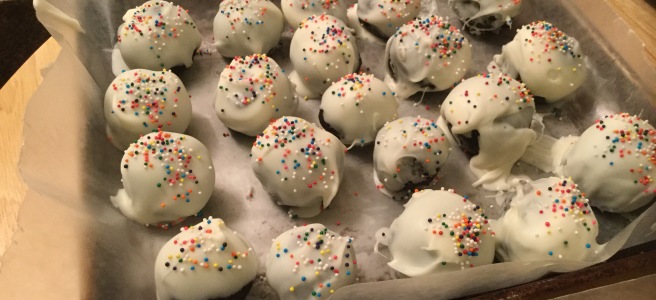
Finally I added my chips.

Then Curt was up to bat! At 325

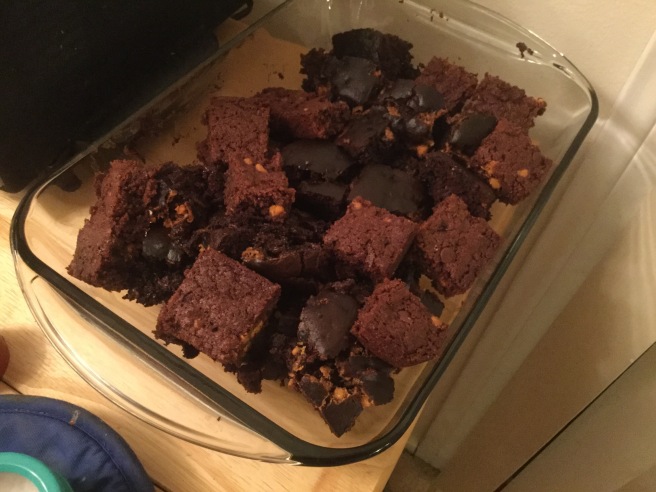
I thought they were done, then I started to cut, but it appeared to be not quite done. So I gave it a little more time.

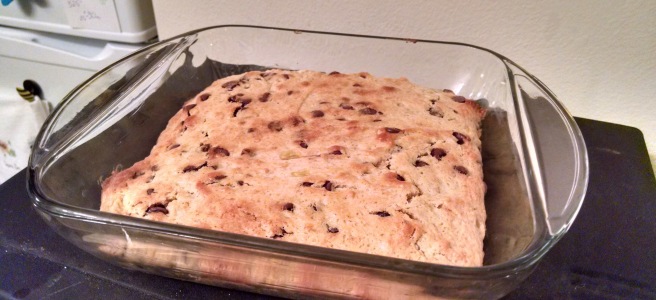
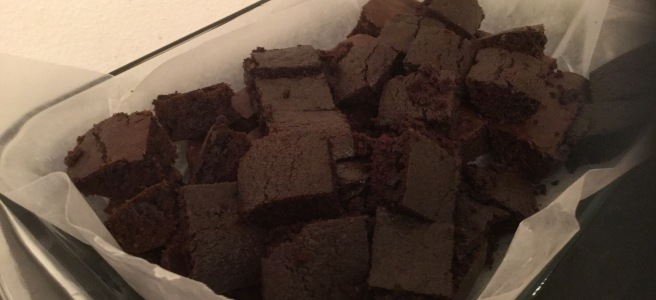
It smelled amazing, but once I had to free the little puppies from their pan, they crumpled. They’re extremely moist and delicious, just not bars.

Attempt #2 – I tried following a recipe a little more closely this time, but realized with the first ingredient that I was short of what the recipe asked… So this wouldn’t be a smooth ride either. Again this was approximately what I used …
1/8 cup melted butter (should have been at least 1/4 or 1/3)

1/4 cup canola oil (should have been none)

1 egg

1/4 cup brown sugar

1/4 cup white sugar

1 tsp vanilla

1 tbsp baking soda

3 tbsp cocoa powder

3/4 cup flour

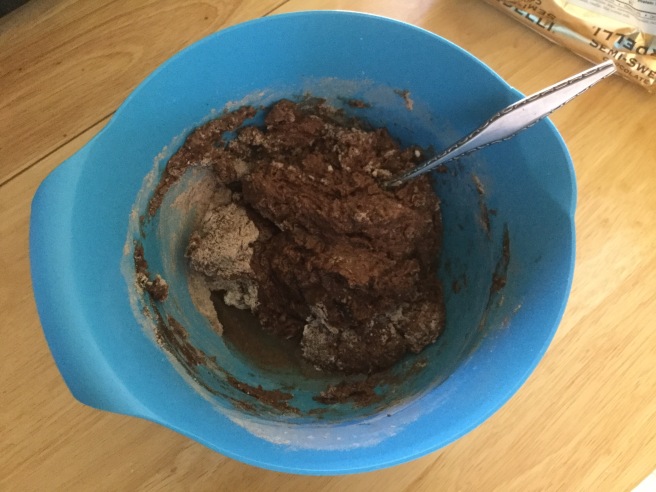
I started with the butter… Then stared at it lamenting that I didn’t have more, and debated going to the store for the second time today to buy more, but decided to push onward with what I had.

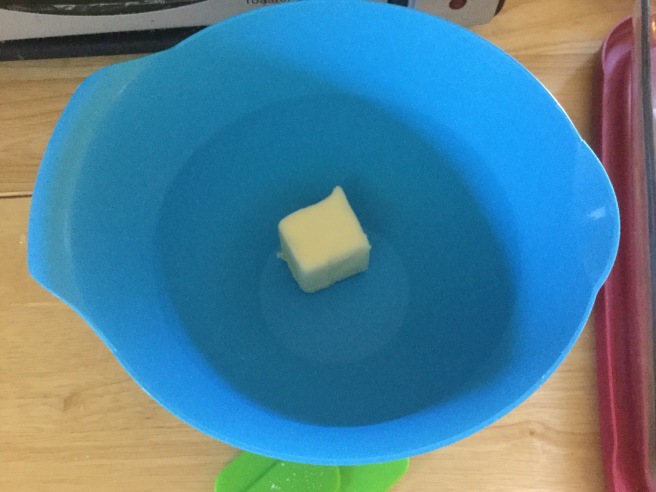
I melted the butter and added some oil to hopefully compensate.

Added my egg, sugar and vanilla.

And the drys.


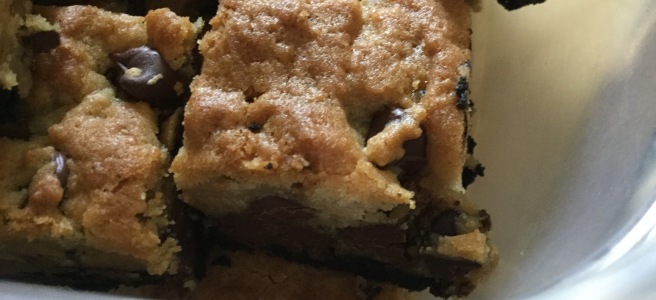
Then into Curt at 350. This tiny batch barely fit in my smallest pan.


Pretty soon the studio had filled with yummy smells, and the bars were done. They held their shape much better. But we’re rather crispy. I think it was the oil.


This duo seems to be of the fraternal variety. But both delightful.


I’m sure my office will enjoy them, none the less.

Xo ~M

Wonderful World Cookies

Earth Day is one of the lesser celebrated national holidays, but I’ve always loved it. It’s an unselfish and loving holiday all about taking a moment (or a day) to step back and recognize how beautiful and special the earth we live in is.
I wanted to spread a little Earth Day love and happiness, so I set out to do it in the only way I know how… Baking!

Again I saw some pictures of this online and decided to give it a shot, this was more about the craft than the baking – cause I used cookie dough mix. But I honestly have never made any kind of cookies from a mix before so there was definitely some adventure in that.
Wonderful World Cookies

We start with your run of the mill sugar cookie mix…. I’m using 2 bags one for each color.

img_20160420_202108449_hdr.jpg

Then add whatever it wants you to add for “drop cookies” – mine needed just a little butter at room temp, and an egg.

img_20160420_202100453.jpg
Then mix together until smooth and doughy – this will take time and muscle.

Once you have the desired texture – we start coloring the world! I used Wilton Colors from Michaels, and kind of a lot of it to get the bright colors I wanted.

img_20160420_203621911_hdr.jpg
The mixing to complete color takes a little time and muscle as well. But they came together well with the bright colors I desired.

img_20160420_203614789_hdr.jpg
Then I started building my earths… Like God. Ya kinda roll up one color and stick little bits of the other on to it – Pretty fool proof.

img_20160420_205330610_hdr.jpg
Then into the oven per the instructions and in about 10 minutes the wonderful worlds are created!!!

img_20160420_212244609.jpgimg_20160420_205916806.jpgimg_20160420_212249057.jpg
Happy Earth Day! Love your World today!

~M

Orange Zest-y Brownies

I’ve been wanting to learn how to make brownies from scratch for a while now, but just haven’t gotten around to it. Then about a month ago, I had some thin brownies with orange zest in them and I thought to myself… Damn I gotta make these.

So I started looking up recipes online, and many many off them require a stove top or double broiler. Then I found a simpler one that just needed boiling water!

3⁄4 cup unsweetened cocoa powder

1⁄2 tsp baking soda

2/3 cup canola oil

1⁄2 cup boiling water

2 cups white sugar

2 eggs

1 1⁄3 cups flour

1 tsp vanilla extract

1/2 tsp salt
I added extra chocolate and orange zest to this recipe.

I started with the cocoa powder and baking soda and just 1/3 c of the canola oil, then shaved in some chocolate off a big bar I had.

Then I added boiling water, I just microwaved a mug of water for way longer than I felt comfortable microwaving it or until I saw steam on the window. (Little tip, this is an easy way to clean your microwave, microwave water, then wipe down the inside of the microwave). Once I added the water I quickly stirred the mixture to melt the chocolate and activate the cocoa- if you got a whisk use it!!!

Then add sugar, eggs, and the rest of the canola oil.

Then I worked on zesting in the orange … And word to the wise, oranges get slippery when you take off their skin. Please read this, and don’t just look at the pictures… DO NOT add the entire orange.

Finally I added vanilla, flour and salt. And mixed until everything was brown.


Then into a buttered up pan an into Curt at 325. Now I always cook brownies from the box at a little lower than the recommended temperature so they’re extra fudgey. They cooked quick… About 15 minutes.


Then I chopped them into bite sized pieces, cause no one ever takes a whole brownie. But now I bet everyone will take 3 or 4.


Sunday Chocolate Sunday ❤️
~ M

Easy Oreo Truffles! 

Sometimes the simplest of things are the most delicious, especially when sugar is involved. I’ve made this recipe once before but forgot just how easy it is! So our shipping department had a BBQ for lunch on Friday and I offered to bring something sweet. Now I knew I would not be able to bake enough treats in lil-o-Curt, or if I did it would take forever, so I decided to make something I didn’t have to bake. Here is my recipe for Oreo Truffles!
Now this is easy-peasey just a little tedious … But it’s only 3 ingredients. Double Stuffed Oreos, Cream Cheese and Candy Melt Chocolate (same I used in my peppermint mark)

Now I tripled the recipe, but you can scale it however you want to fit your needs.

1 package of double stuffed Oreos

4-6oz Cream Cheese

Candy melts chocolate (Michaels has every different color and flavor)

I started by blending up the Oreos. Now I only have my little magic bullet, but if you have anything bigger especially a food processor I highly recommend using it. I could only fit about 6 Oreos in my bullet and even then the bottom would get packed so I would shake whole blender while it was running to insure it blended everything evenly.


Then I added cream cheese, start with about 4oz per package of Oreos. Add more if it’s not all sticking together.


Once it’s all homogeneous start rollin! Aim for about one inch balls, two bites it’s ideal. Then place all the balls on a sheet of wax paper, and stick in the freezer for at least 10 minutes.  

Then I melted down the dark chocolate per the instructions on the bag.


My first idea of how to coat the balls was to pour the chocolate over balls with a grate underneath to catch the chocolate.


Didn’t work well, got my fingers covered in chocolate and the balls were covered in finger prints. Not the end of the world, but not the goal. So I decided to stick them with a toothpick and kinda dip them. Then quickly add the sprinkles as the chocolate hardens quickly.


I did the same with the white chocolate which is much prettier!


Then they just chill in the fridge until they’re ready to be eaten. And so so good!


Enjoy! And share with good people! ~ M 

Damn Good Peanut Butter Chocolate Chip Bars

So tonight I wanted to do some baking. My first thought was to make some chocolate chip cookies, but the biggest cookie sheet that will fit in Curt probably will only hold 6 or so cookies, which means I’d have to do 3-4 batches to bake all the cookies. But I do have my trusty little casserole pan which can fit some delicious deep dish cookies with much less effort. I looked up a few recipes for cookie bars then of course adapted my own.


Based on the ingredients I had, I decided on Peanut Butter Chocolate Chip Bars with a Oreo Crust… because I still have Oreo wafers leftover  from my pumpkin pie, they were taking up room. It also all just sounded so good all together.

I started by trying to smash up the chocolate oreo wafer cookies with a wine bottle. I was not very successful… but they were a little smaller than they were when I started.

image

image


But it was good enough so I added some melted butter and spread them out in a foil lined pan, for easy clean-up and ease of serving. Since they were so chunky, I did my best to make sure they were even but I knew they would be held together by the dough. *If you have a food processor, just use that. This doesn’t work great.

image

Next for the dough. Pretty classic cookie dough, I shorted a normal recipe so it’d all fit in my little pan.

Started with Flour, Sugar (Brown and white), Baking soda.

image

Then an egg, vanilla, and almond milk. Then I mushed it all together.

image

Once it was well combined I added peanut butter, stirred that until it was all peachy and added chocolate chips!

image

Finally I spread the dough on top to the cookie crust, evenly and carefully without messing up the crust.

image

Not too shabby… Curt your up! Do your thing at 350°

image

No I had no idea how long it would take, but it went really fast. Dunno how fast cause I didn’t set a timer, but I was worried the top was just getting brown but the insides were gonna be gooey. So I turned the temp down to 250° for another 10 minutes then pulled them out.

image

The smell is amazing! I let them cool for quite a while, then tried a chunk… and it was killer, so decadent.

image

Then the next day I lifted out the foil and cut the bars up into easy serve pieces to share with my peeps!

image

Approximate Recipe is as Follows…

1 1/2 cup Flour

1/3 cup White Sugar

1/3 cup Brown Sugar

1 tsp baking soda

1 egg

1 1/2 tsp vanilla extract

1/4 cup almond milk

1/2 peanut butter

1 – 3/4 cup chocolate chips

1/2 package of famous chocolate wafers (Crust)

Instructions – Above

Hindsights 20/20, I recommend — Bake 325° for 20 min until golden brown.


Sharing is caring and delicious! ~M 

Baking for Survival – Bread to warm you

It’s cold. I mean it’s not that cold, but it pretty cold. I know plenty of people are in like -5° below temps or whatever across the country but our 43° is pretty unreasonable! Anywho my little peanut space heater wasn’t really doing the trick so I needed an excuse to fire up Curt for a little while earlier this week.


I love me some fresh baked bread, so I had some Banananers in the freezer, as I always do, so the decision was made… Banana Bread!! Again, I don’t like measuring or following recipes but I’ll try to make this pretty uniform and spell it all out for the squares in a “recipe” at the end.

Starting with the the white stuff… flour that is.

img_20151230_210011832.jpg

Smells good… but not like flowers.

img_20151230_210040246.jpg

Next some sugar, I love mixing white and brown sugar so in most recipes I use both.

img_20151230_210224687.jpg

Then more white stuff, baking soda and salt.

img_20151230_210434184.jpg

So colorful right? Didn’t think so… I’m boring myself. How about more brown…? Cinnamon makes everything better.

img_20151230_210639424.jpg

Still think it looks the same? Yeah it does. Next one egg, melted butter (white-ish), vanilla (brown), almond milk (white), and a few unfrozen bananas (yellow/brown). What do you get?

img_20151230_212001194.jpg

Light brown… Woop Woop! I’m still bored, Let’s add some color…

img_20151230_212121020.jpg

Hellooo Beauties!! Blubes!! Swim little fellas… Swim Swim!

img_20151230_212253393.jpg

Fellas didn’t survive the tornado… drowned blubs! Next it’s into the pan, all greased up.

I love love love topping bread with brown sugar, it creates an amazing crust caramelized! Then Curt goes to work at 350°! About 50 minutes and the most amazing smelling heater later…

img_20151230_221224311.jpg

Grab a napkin, your drooling and it’s time for some warm bread.

img_20151230_222316791.jpg

So perfect! .. now for the squares, a recipe.

Blueberry Banana Bread 

1 1/2 cups flour

1/3 cup white sugar

1/3 cup brown sugar – hand full for topping

1 1/2 tsp baking soda

pinch of salt

shake of cinnamon

1/3 cup melted butter

1 egg

1/4 cup almond milk

1 tsp vanilla

2 unfrozen bananas (how? see oatmeal cup recipe)

1/4 cup of fresh blueberries

350° for 50 -60 minutes


And I just remembered I wanted to add Chia seeds… oops.

Maybe Next Time ~ M 

Addictive Waffle Cone Peppermint Bark

Looking for the perfect party favor or Christmas gift this Holidays, then boyyy I got the one for you… follow me! OOOOooooo

img_20151219_154437237.jpg

Now I must confess, this was a classic case of “Hey! I can do that!”. Last week I found these delicious gems at TJs, I ate a whole box on my own then brought some into work and everyone just loved them!!

They’re called mini Peppermint Waffle cookies, and are highly addictive. I thought it would be pretty easy to make these myself, so I worked on gathering the goods.

First I got some waffle cones from the Cold Stones Creamery down the street, only 80 cents each… pretty reasonable. I almost ate half of one of the cones on the drive home, and I’m only 2 mins from Cold Stones, they were warm and smelled so good! I got 6 because there was no way they wouldn’t go to use one way or another.

20151220_001825.jpg

I got melting chocolate and some candy canes, then ate a salad so I’d stop eating the waffle cones.

img_20151220_001745.jpg

I broke up the waffle cones into relatively small chunks, only nibbling a little as I did. They’re like my Achilles heel, I was powerless.

20151220_001930.jpg

I decided to smash the candy canes next so they would be ready when the chocolate was still hot. Double bag the candy canes… for safety, ideally with freezer thickness bags. And smash away with a big hammer or heavy pot. I suppose you could also throw them into a food processor to speed this up, its a little tedious.

20151220_001955.jpg

And into a cup for easy sprinkling!

20151220_002021.jpg

Then I melted the chocolate in microwave and drizzled it all over the waffles, tossing them around a bit. In the future I might use bigger trays or spread out the waffles more. They ended up all sticking together in big chucks that needed to be broken up a little bit, but no big deal. All still edible.

img_20151219_154907880.jpg

As soon as the chocolate is evenly dispersed, sprinkle on the candy canes. Then let cool for a few minutes, this chocolate set in about 15 minutes.

20151220_002145.jpg

All done! I took these to two parties I went to in one night, and they were a hit at both! These delightful treats will definitely be making an appearance at Christmas!

The Holidays taste sooo good! ~M